


Dear Reader,
One of the most asked questions I receive: “How do I authenticate my Ralph Lauren Ricky!?” Honestly, if I had a dollar for each time I’ve been asked, I could have added an 8th Ricky to my collection. But I don’t mind, I truly love the Ralph Lauren Ricky bag (see proof here) and I love looking at all the different models and variations that have released over the years. So, keep the photos and the requests coming! However, when perusing eBay I came across the most heinous fake Ricky I’ve ever seen, and I have the authentic version of this bag- so I thought to myself: this is the perfect time to create a guide! Now, the Ricky bag has been an icon for over 20 years, and during that time, there have been numerous seasonal models, variations, materials, colors, the options for the Ricky are truly endless. This guide will mostly focus on the entry level Soft Ricky 33. This is the most common and by far the most affordable in the Ricky lineup- but even within the Soft Ricky 33 lineup, many changes and updates have occurred over the years. All that to say- take this with a grain of salt, it’s not a definitive guide to ALL Ricky bags, but it should help get you started on authenticating yours!
Getting Started


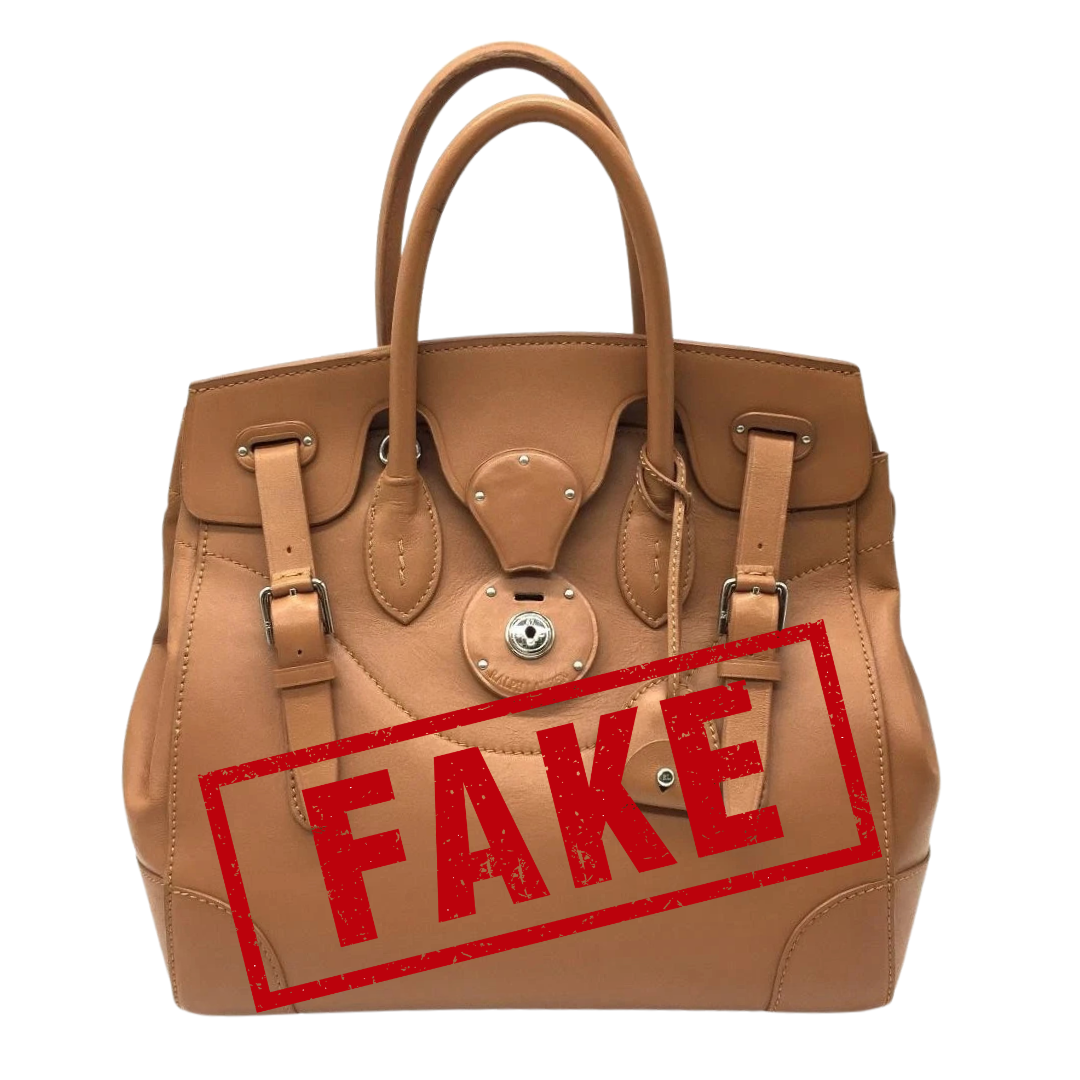
Throughout this guide, the fake bag will be on the left and my iconic and very authentic bag will be on right. Just at first glance, I see 7 things wrong with the front of the fake bag. Can you spot them? Spoilers ahead:
- The first telltale sign is the top portion of the lock on the flap. Notice how on the fake version it’s quite puffy and the rivet heads are large and out of proportion? On mine, the leather is flat, and the size of the rivets match with the rest of the hardware and proportions.
- The lock plate itself- again, overly large rivet heads, and the “Ralph Lauren” stamp is also over sized and runs from one rivet to the other. On mine, there’s a break between the stamp and rivets.
- The key clochette is on the worlds longest strap. Typically with all of my Ricky bags, the key bell stops at the middle or just at the bottom of the lock plate. On the fake, it’s almost longer than the strap through the buckle.
- Speaking of the straps- they look terrible. Notice how teeny tiny the holes are in the straps? They look incredibly “cheap” and you know how much I hate that word. Small holes denote lesser quality hardware.
- Now the buckles are also problematic- the leather rollers are too small for the buckles. On mine, the leather rollers touches both sides of the buckles.
- The little enclosures around the strap holes at the top are also wrong. Notice how mine are stamped “RL” at the top in the leather? On the fake, they’ve omitted the stamp. Additionally, the rivets are once again far too large. The rivets on this part of the bag should be in between the two lines, not over them.
- The handle attachments also taper inward toward the top, where the top should look much more symmetrical to the bottom.
And this is just on the front- we’re only getting started!
The Back


The Backside of this bag is also a mess. Here, there are 3 main points to look at:
- Again, the end of the handle is too tapered at the top
- We also see the oversized hardware rivet on the little hole surround, and no “RL” stamp on the fake.
- The handle should have a bit more space between the bottom of the tip and swooping stitched line across the back.
And this is where we can really see how terrible the stitching is. The authentic Ralph Lauren Ricky takes 8-12 hours to complete by hand. The stitching on the fake is crowded, crooked, and the tension in the sewing machine must have been really off, because wow, those are some wonky stitches.
The Flap


Now, let’s dive into the flap. On the fake, we can see that it’s pretty flimsy, also, the pieces that go around the handles leave a lot of room. The Ricky is very similar to a Birkin- all of the design elements are pretty precise and harmonious with the overall design and function of the bag. We can also get a closer look at the tiny holes on the straps and buckles. Overall, the fake looks like a cheap imitation.
The Stitching
Here we have a closer look at the stitching. See how close the stitches are on the fake? On mine, they’re evenly spaced, and they’re stitched at an angle. And on the bottom of the bag, the stitches are the correct count, but again, we have a front row seat to the poor craftsmanship of the counterfeit.


The Interior
Let’s take a look at the interior. On the fake, we can see they lined it with lower quality leather. Also, the button is incorrect. On my Soft Ricky bags, the “male” part of the button is on the back wall of the interior but on the fake, this is reversed with the “male” part of the button on the pocket itself. Does that make sense? I hope it does.


This interior plaque was the biggest giveaway. The “Ralph Lauren” font changed every few seasons or years. You can get a Soft Ricky with either the cursive script, or the Serif font in the photo of the fake. But make sure it’s all spelled correctly. I’m sure none of us have any clue where “Itaky” is. Also, the silver plaque should be almost as big as the little leather backer it sits on- the fake leaves an ocean of space around the plaque.


The Strap and Keys
Not many people look at these details, but trust me, you won’t want to miss this part. On the fake strap, the end of the strap and where the buckle attaches are cumbersome and poorly looped together. On mine, those parts of the strap are slim and professionally connected.


The keys are the same story- the strap holding the key bell on is poorly finished, and the holes leading into the key bell are circular, whereas the authentic bag has more of a rectangular hole for the strap to go through.


And these are just a few things that stood out to me on the counterfeit Ricky. Did you notice anything I missed? Let me know down below! And if you’re looking for some great Ralph Lauren Ricky content, check out my YouTube videos here!

Leave a Reply